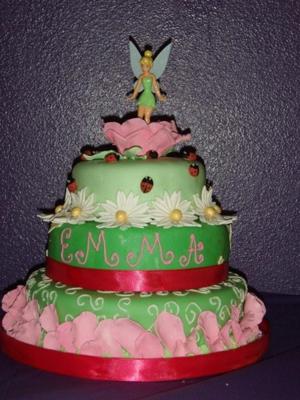
A Little Fairy Dust – Tinkerbell Cake
by Karey Pierce
(Harker Heights, Tx)
1. I started with the gum paste flowers. These can be made days, even weeks in advance. This is nice because you can take your time and enjoy. For the rose petals, I used a rose cutter along with a ball tool to frill and shape the gum paste. The rose was done the same way, but with a lollipop stick (to secure the rose to the cake). I found some great websites with step by step instructions on making a rose if you are a bit nervous about it (like I was) these will really help.
The daisies were very easy, done with a daisy shaped cutter. I stacked one on top of another, made a small indent with the ball tool, and placed a small ball of gum paste that had been rolled in edible yellow glitter called pearl powder.
The stars were cut out of white gum paste and brushed with the same yellow pearl powder.
The ladybug bodies were hand rolled out of red gum paste. The heads and spots were painted on with black food coloring mixed with a tiny bit of vodka (it evaporates easily and does not make the gum paste gooey).
I know this sounds like a lot, but a few nights in front of the TV, or in the kitchen with some good music, and you will be done before you know it.
2. The cakes were made from a mix. The top and bottom layers were strawberry and the middle was chocolate. The frosting (filling for the layers and to hold the fondant on) was chocolate for the bottom and top and strawberry in the middle. I used the Wilton recipe for frosting, but added strawberry flavoring for the strawberry and 1/2 cup of Hershey’s baking cocoa powder for the chocolate. The layers were 12, 10, and 6 inch. Each tier had 2 layers of cake.
3. The fondant used was a homemade marshmallow fondant. This is extremely easy to make, the recipe can be found online. I only needed one batch for the whole cake. This also tastes MUCH better than the store bought version.
4. To assemble the cake I started with the fondant. I covered each tier with a slightly different shade of green. On the bottom tier, I used white frosting to pipe swirls around the top and edges (remember you do not have to do the whole top as you are stacking the cakes). Then I put a small border of green frosting around the bottom in order to adhere the petals.
The second tier is just a piped name with the gum paste stars “glued” on with a little frosting. I also took some of the yellow pearl powder and “painted” star dust trails by dipping my brush in a little colorless alcohol the in the powder. The ribbon was placed on after the layer was put on top of the bottom.
The final tier was very simple. I added the rose to the top by inserting the lollipop stick into the center of the cake, then placed this layer on top of the cake. The daisies were then “glued” around the bottom, and the ladybugs “glued” randomly to the layer.
**I did support the middle and top tiers with four wooden dowels cut to fit. This is not an incredibly heavy cake, but I always find it to be better safe than sorry!
This cake looks very difficult, and sounds like a lot of work, but trust me…go step by step, take it slow, and you will have a beautiful cake that you will be very proud of!
Comments for A Little Fairy Dust – Tinkerbell Cake
Average Rating |
||
|
||
|
||
|
||
|
||
|
||

