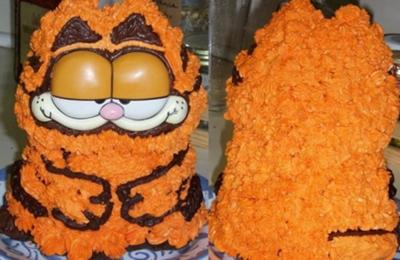
Garfield the Cat Cake
by Jessica C.
(Bloomington, IN)
This Garfield the Cat cake was made for my young cousin’s birthday last year. She and I both love Garfield so I searched around for an ideal pan to make the cake with. The perfect pan for my purposes ended up being a vintage 3D Wilton cake pan I found on eBay. The cake pan had a front side and a back side that clipped together to create one upright 3D pan.
To fill the pan, simply clip the two buttered and floured cake pan pieces together, then flip the pan upside down onto the provided base (it sits on Garfield’s ears) and pour the cake batter into the bottom hole of the pan (what would be the base of the pan if it sat upright). Only fill the pan to within 1″ of the edge, to allow for the cake’s expansion while baking.
The cake itself consists of 2 boxes of Cherrybrook Kitchen chocolate cake mix. This brand of cake mix is dairy, egg, peanut and nut free. Since my cousin has several food allergies, including eggs and nuts, we decided that this would be the easiest way to let her enjoy her birthday cake without worrying that she was going to have an allergic reaction. Plus, the cake mix is full of delicious miniature vegan chocolate chips, so it was very chocolaty. But, if the child you are creating this for does not have any specific allergies, any dense homemade cake batter would work wonderfully.
A few quick tips on baking cakes in a pan like this:
Allow up to two and a half times the specified baking time from your recipe/cake mix instructions. This is a deep pan, so be sure to give the cake plenty of time to fully bake. Also, be absolutely sure 3D pans of any sort are placed into the oven and baked on top of cookie sheet or other flat pan, to catch any cake batter that flows over during the baking process. Finally, allow the cake to completely cool before un-molding it from the pan, to prevent the cake from sticking to the pan and to prevent structural problems. I learned this the hard way when Garfield’s head fell off, but fortunately it was easy to repair with a bit of frosting.
Notes on decorating:
The cake pan set came with a plate with Garfield’s eyes, so the most complicated/detailed part of the decorating process was taken care of; I simply ‘glued’ it on with some frosting. I used a basic vanilla buttercream recipe for the orange frosting:
1 box confectioners’ sugar
1 stick unsalted butter, room temperature
1 teaspoon vanilla extract or vanilla bean paste
1/4 cup milk or light cream
orange gel food coloring
Beat the confectioner’s sugar and butter together using an electric mixer until they are a frosting-like consistency. Use the milk to thin the frosting as needed with the mixer. Add vanilla extract or paste and orange gel food coloring to the frosting. Mix in and decorate.
Note: To make chocolate frosting, omit the orange gel food coloring and add 1/4 cup cocoa powder.
Add the orange frosting to a piping bag with a star tip. Apply the tip of the piping bag directly to the cake and then apply just enough pressure to leave a small star-shaped spike on the cake’s surface. Repeat until the part of the cake that you want orange frosting on is completely covered. Add accents (like stripes, a tail, a border around the eye plate) with chocolate frosting piped through a tube tip. Refrigerate until ready to serve.
Return to Character Birthday Cakes.

